
|
LILLY ROBOT |
FORMS
Forms are very useful to have on a website. You can use them to collect various information about your visitors. Different types of forms can be created to collect different data.
A feedback form would contain: name, address, email, telephone number and a feedback from the user.
A business website selling items would use an order form for the customer to complete and submit.
Let's have a look at the structure of a form.
Form Structure
<html>
<head>
<title>Form</title>
</head>
<body>
<form> Start of form
All the form controls go in here
e.g. text boxes, textarea, radio buttons
</form> End of form
</body>
</html>
We are now going to look at the form attributes Method and Action. Both these attributes are needed in a form.
Method Attribute
The data in a form are sent using the post or get method. The get method is used for information that are not confidential and for short forms such as search engine query.
The post method is used for updating data, loading files and for sensative information. If you are going to create a form with personal information i.e. name,addresses and national insurance number then use the method="post".
Action Attribute
The action attribute is the URL (webpage address) on the server, where the form details are sent to. You could also send it to an email address.
Have a look at the examples below. Please note the URL and email addresses are not geniune. They are just examples to help you understand.
URL
<form method="post" action="http://www.robotcode.com/ex/p.php">
</form>
EMAIL
<form method="post" action=mailto:robotcodes@mymail.com">
</form>
Control Forms
Inside the form tags we have the control forms. The first control form we are going to look at is the input tag.
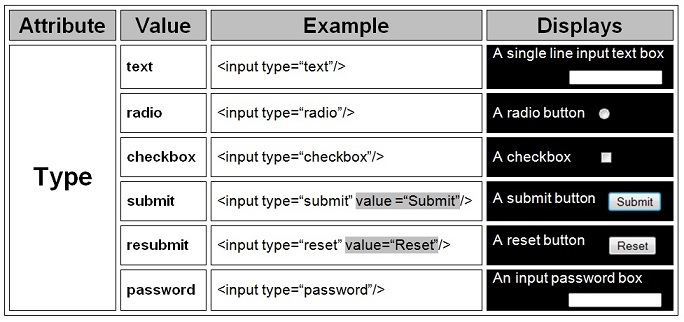
Input Tag
The input tag does not have a closing tag <input/>. It has an attribute called type with different values. These values define the input field. The table below shows a list of the values:
Input Type: Text
A server will only recognise a form via its form name; it helps to specify a form name related to what your form is about. You can create more than one form on a single webpage.
Below we have created a form called "textBox" and an input type="text", which allows you to input data on a single line.
<html>
<head>
<title>Form</title>
</head>
<body>
<form name="textBox" method="post" action=mailto:email address">
First Name:<input type="text"/>
</form>
</body>
</html>
Displays
First Name:
The webpage displays a single line text
box, which allows you to input data.
The <input type="text"> has the following attributes:
- size
- maxlength
- name
- value
Size Attribute
The size attribute will be seen in the older version of HTML. It increases the width of the text box. In a text box there is no maximum restriction to the number of characters a user can input.
<input type="text" size="20"
Displays
In HTML5 the CSS width property is used. Although, it still accepts the size attribute. Below is an example using the CSS inline style.
<input type="text" style="width:120px;">
At this stage don't worry too much about CSS. For now we are going to use the size attribute but once you have learnt CSS you will start using the width property. Let's have a look at differnt text box sizes.
Enter Course Name:<input type="text" size="25"/>
Enter Course Number:<input type="text" size="10"/>
Enter Start Date:<input type="text" size="20"/>
Displays
Enter Course Name:
Enter Course Number:
Enter Start Date:
There is no restriction to the number of characters you can input into each of the text boxes.
Maxlength Attribute
The maxlength attribute limits the number of characters a user can input.
Enter code 4321 <input type="text" size="4" maxlength="4"/>
Enter code 1212 <input type="text" size="9" maxlength="2"/>
Displays
Enter code 4321
Enter code 1212
In the first text box you can input the numbers 4321 because the maxlength is 4, which means the maximum number of characters you can input is 4.
In the second box the maxlength is 2. Therefore, it will only let you input the first two numbers 1 and 2.
Why don't you try entering the numbers.
Name Attribute
The name attribute helps the server recognise which form control the user has entered the data into.
Card No.<input type="text" size="4" name="cardNo" maxlength="4"/>
Book Name <input type="text" size="20" name="bookName"/>
Displays
Card No.
Book Name
In the above example if you ommitted the name="cardNo" the server would not pick up the card data 2333.
Therefore, it is important to have a name attribute for all your form controls.
Value Attribute
The value attribute allows you to initialize a value inside the text box. If you want the user to input the data, inside the text box, then you will have to type the double quotation marks "" as the value.
Enter Name:<input "type="text" value="HTML Course" size="12"/>
Enter Name:<input "type="text" value="" size="12"/>
Displays
Enter Name:
Enter Name:
The first text box value has been initialised to 'HTML Course', which cannot be changed by the user. The second text box has been left empty for the user to input the data.
Note! You can use the maxlength attribute to limit the number of characters a user can input.
Input Type:Password
The <input type="password"> is a single line text box that allows the user to input a password without the characters being displayed - you can only see the dots. Always make sure it is a secured website before you input any personal details. A secured website will have the protocol https.
Enter Password:
<input type="password" maxlength="11" size="15" name="password"/>
Displays
Enter Password:
Type the password 'H8password&' inside the password box.
Input Type:Radio Buttons
Radio buttons are good to use if you want the user to select a choice from a list. Have a look at the example below.
Displays
Please select a language you want to learn:
French
English
German
Italian
Arabic
Hindi
The attributes for <input type="radio"> are:
- name
- value
- checked
Name and Value Attributes
Radio buttons are grouped, so the value for the name attribute would be the same, in the example below the name value is language.
Now you might be wandering how does the server recognise which radio button you have selected, if the name attribute for all the buttons are the same. Well, the value for the value attribute differs for each of the radio buttons.
If you selected French the name attribute along with the value attribute are sent to the server, so it recognises the radio button you have selected. Have a look at the example below.
French<input type="radio" name="language" value="French"/>
English<input type="radio" name="language" value="English"/>
German<input type="radio" name="language" value="German"/>
Italian<input type="radio" name="language" value="Italian"/>
Arabic<input type="radio" name="language" value="Arabic"/>
Hinid<input type="radio" name="language" value="Hindi"/>
Checked Attribute
A radio button can be selected as a default using the checked attribute.
Harp<input type="radio" name="music" checked="true" value="Harp"/>
Guitar<input type="radio" name="music" value="Guitar"/>
Piano<input type="radio" name="music" value="Piano"/>
Recorder<input type="radio" name="music" value="Recorder"/>
Displays
Select an instrument:
Harp Guitar Piano Recorder
The default radio button is Harp.
Input Type: Checkbox
The Checkboxes in a form allows the user to select one or more options.
The attributes for <input type="checkbox"> are:
- Name
- Value
- Checked
Like the radio buttons, the values for the name attribute are the same and the values for the
value attribute are different.
<p>Please select one or more options.</p>
<p>My hobbies are:</br>
<input type="checkbox" name="hobbies" value="cook"/>Cooking
<input type="checkbox" name="hobbies" value="read"/>Reading
<input type="checkbox" name="hobbies" value="dance"/>Dancing
<input type="checkbox" name="hobbies" value="swim"/>Swimming
<input type="checkbox" name="hobbies" value="other"/>Other
</p>
Displays
Please select one or more options.
My Hobbies are:
Cooking
Reading
Dancing
Swimming
Other
Input Type: Submit and Reset Buttons
Submit Button
The submit button is used to submit your form.
The submit button has the following attributes:
- Name
- Value
The name attribute value will be the form name. You can have several forms on your website, which can be submitted by a user.
The value attribute value will be the name of the button, which will be displayed on the screen. Have a look at the example below.
<input type="submit" name="form1" value="Submit"/>
<input type="submit" name="form2" value="Send"/>
Displays
Form 1
Form 2
Reset Button
The reset button clears everything on the screen that you have entered.
<input type="reset" value="Reset" />
Displays
In the example below we have created a form with the submit and reset buttons.
Example
<form method="post" action= mailto:"robotlilly@"".com >
<p>
Check availability of a Book:</br></br>
<input type="radio" name="cover" value="Paper Back"/>Paper Back
<input type="radio" name="cover" value="Hard Back"/>Hard Back </br></br>
Enter Book Name <input type="text" name="text1"/></br></br>
Enter Author Name <input type="text" name="text2"/></br></br>
<input type="reset" value="Reset"/>
<input type="submit" value="Send"/>
</p>
</form>
Displays
Input Type: Button
A button can be added to do various action on a form such as alert a message. A button has an onclick event handler, which you will learn more about in JavaScript.
<p> Lilly Robot would like to say:
<input type="button" name="msg" value="Msg" onclick="alert('Hello')"/>
</p>
Displays
Lilly Robot would like to say:
Text Area
The textarea creates multi-line text input. It has an open tag <textarea>and a close tag </textarea>.
All text inside the tags will
be displayed on the screen.
<textarea >
Hello this is the text area.
</textarea>
Displays
The attributes: rows and cols were used in the older version of html to adjust the height and width of the text area.
<textarea rows="5" cols="30" >
Please give us your feedback:
</textarea>
Displays
Note: The CSS height and width properties are used in html5.
Dropdown List
The dropdown list allows the user to select an option from a list. It has an open tag <select> and a close tag </select>.
<select> </select>
Displays
Inside the select tags we have the option <option></option> tags.
Select a cake flavour:
<select name="cakes">
<option value="none">None</option>
<option value="lemon">Lemon</option>
<option value="chocolate">Chocolate</option>
<option value="orange">Orange</option>
</select>
Displays
Select a cake flavour:
The <select> has the following attributes:
- name
- size
- mulitple
Size
The size attribute allows you to display a number of options on the screen. In the example below we have 4 options but have decided to display only 3 of the options. If you want to see option 4 then you will have to scroll down.
<select name="cakes" size="3">
Displays
Select a cake you like:
Multiple Attribute
The multiple attribute allows you to select more than one option. You will have to hold down the Ctrl key on the keyboard when selecting more than one options.
<select name="cakes" size="3" multiple>
Select two colours:
<option value="red">red</option>
<option value="green">green</option>
<option value="blue">blue</option>
</select>
Displays
Select two colours:From the above drop down list why don't you select the colours red and blue. Remember to hold down the Ctrl key.
The<option> has the following attributes:
- value
- selected
Value
The value attribute value will be the option the user selects from the dropdown menu.
Selected
The Selected attribute is used to select an option that would be displayed when the page is loaded.
Select a Colour:
<select name="color">
<option value="black">red</option>
<option value="black">green</option>
<option value="black" selected>black</option>
<option value="blue">red</option>
<option value="silver">green</option>
>/select<
Displays
Select a colour: